Instant Quoting Design Guide
A step-by-step walkthrough of the Xeon NC quoting platform — from selecting your material to submitting notes for the manufacturer. Learn what every option does and how to configure your part for the most accurate price.
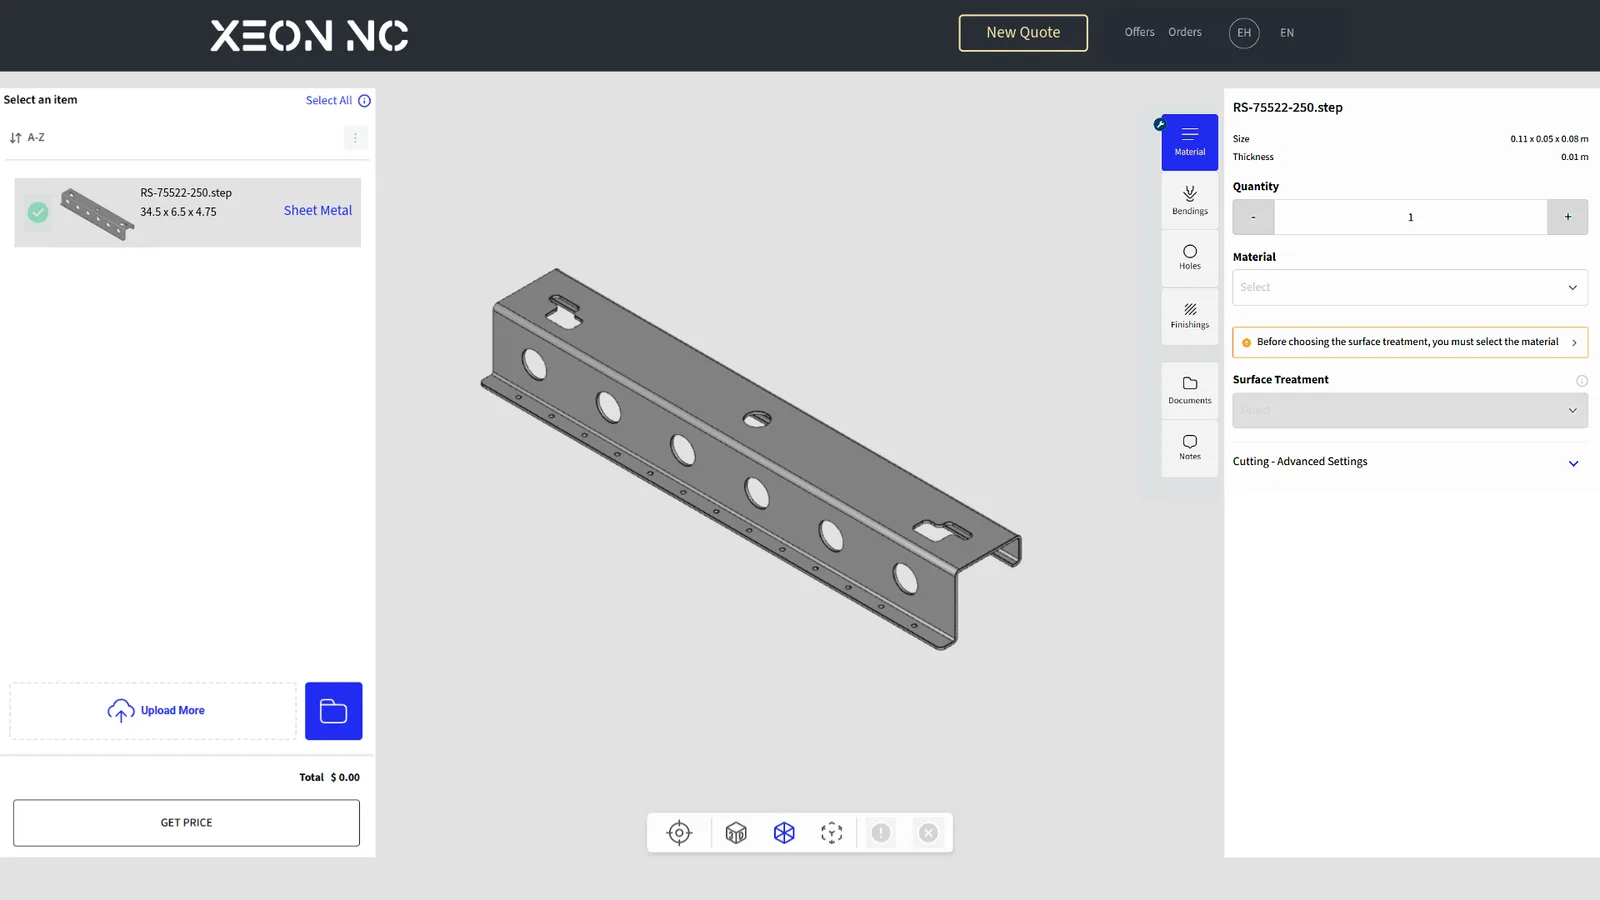
The Xeon NC instant quoting engine turns a single CAD upload into a firm production price in under 60 seconds. To get the most accurate quote — and the part you actually want — six configuration sections need to be filled in correctly. This guide walks through each one in order.
Use this page as a checklist while configuring your first quote. Every section in the sidebar matches a panel inside the quoting interface, with screenshots so you know exactly where each field lives.
What you’ll configure
- Material, gauge & quantity
- Bend angles & flange lengths
- Hole processing & finishing
- Surface finish & RAL color
- Technical drawings & references
- Manufacturer notes
Before you start
- Have a DXF, DWG, or STEP file ready
- Know your target material & quantity
- Decide on your finish (raw, powder, anodized)
- Have any drawings or assemblies handy
The Quoting Workflow
The Xeon NC platform uses a left-to-right configuration flow. Each panel feeds into the next — for example, the material gauge you choose dictates the available bend radii, and the surface finish drives whether anodizing or powder coating is offered.
| Step | Panel | What you set |
|---|---|---|
| 01 | Material | Alloy, gauge, quantity, surface treatment |
| 02 | Bendings | Bend angles, flange lengths, bend count |
| 03 | Holes | Hole processing — tapping, countersink, deburr |
| 04 | Finishings | Powder coating, anodizing, RAL color, sheen |
| 05 | Documents | Upload technical drawings & references |
| 06 | Notes | Free-text instructions for the manufacturer |
Material — Select Material, Quantity, Surface Treatment
The Material panel is where every quote begins. Choose the alloy, gauge (thickness), and quantity, and the system recalculates pricing in real time.
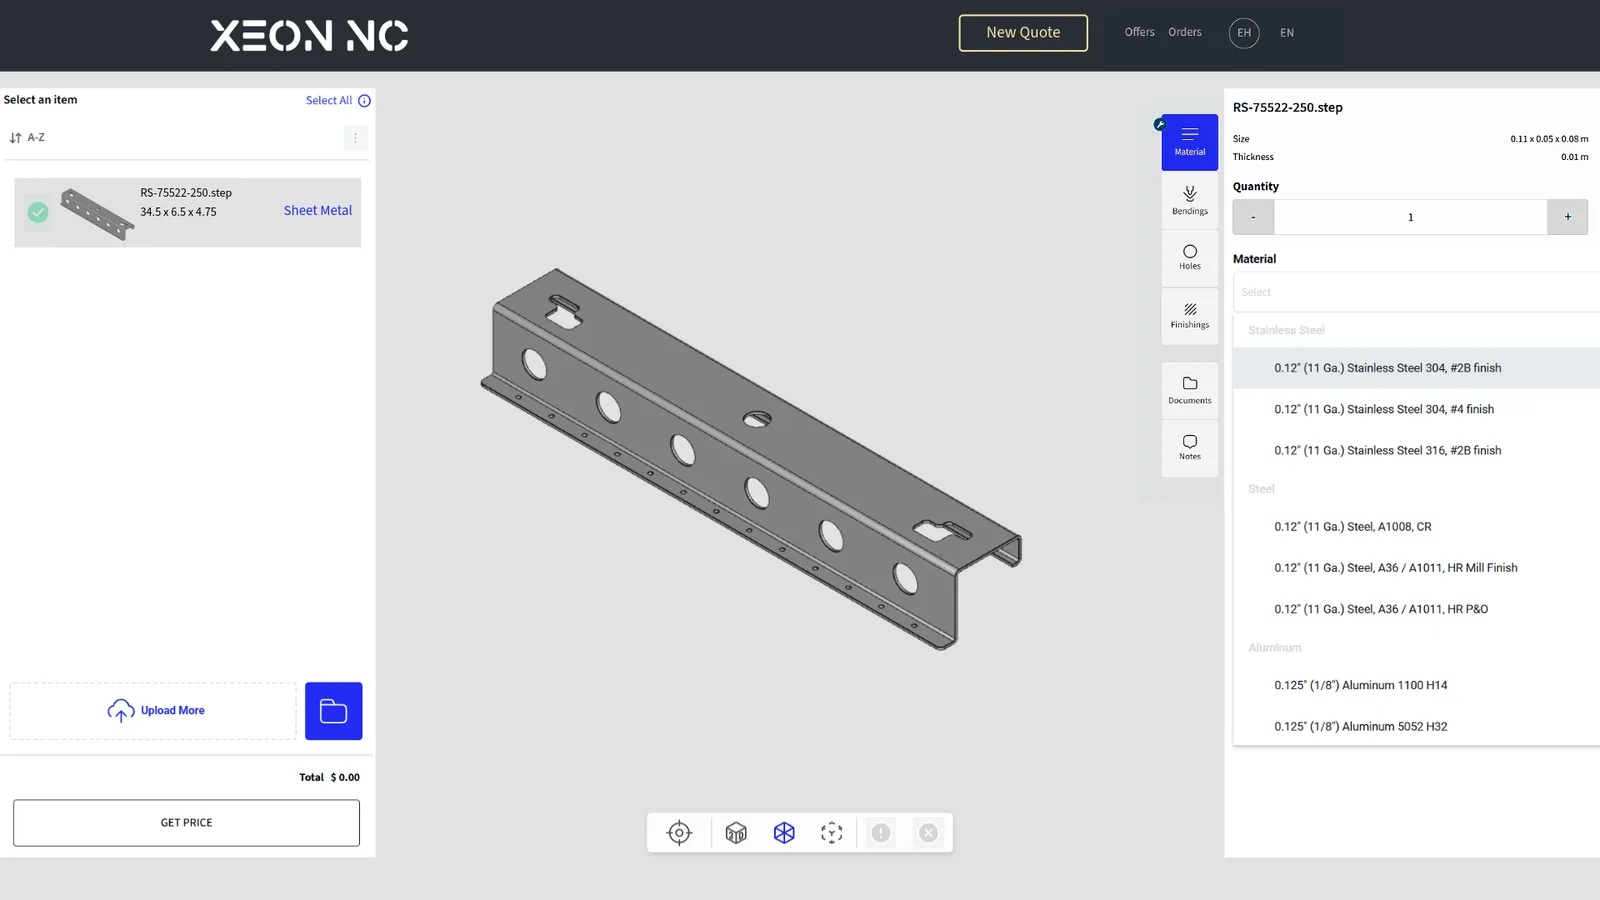
What to configure
- MaterialAlloy family. Carbon steel, stainless (304/316), aluminum (5052/6061/3003), brass, copper, or galvanized.
- GaugeThickness. Choose from stocked gauges (24 GA → .500"). The list updates based on the alloy you selected.
- QtyQuantity. Drives quantity-break pricing. Increasing quantity reduces per-part cost via shared nesting and setup.
- SurfaceMill surface treatment. Mill finish (raw), 2B (stainless), brushed, or pre-coated. This is the as-received surface, separate from the finish you apply later.
Bendings — Define Bending Angles and Lengths
If your part has any bends, the Bendings panel is where they get defined. The system auto-detects bend lines from your CAD model, but you can adjust angle, direction, and flange length manually.
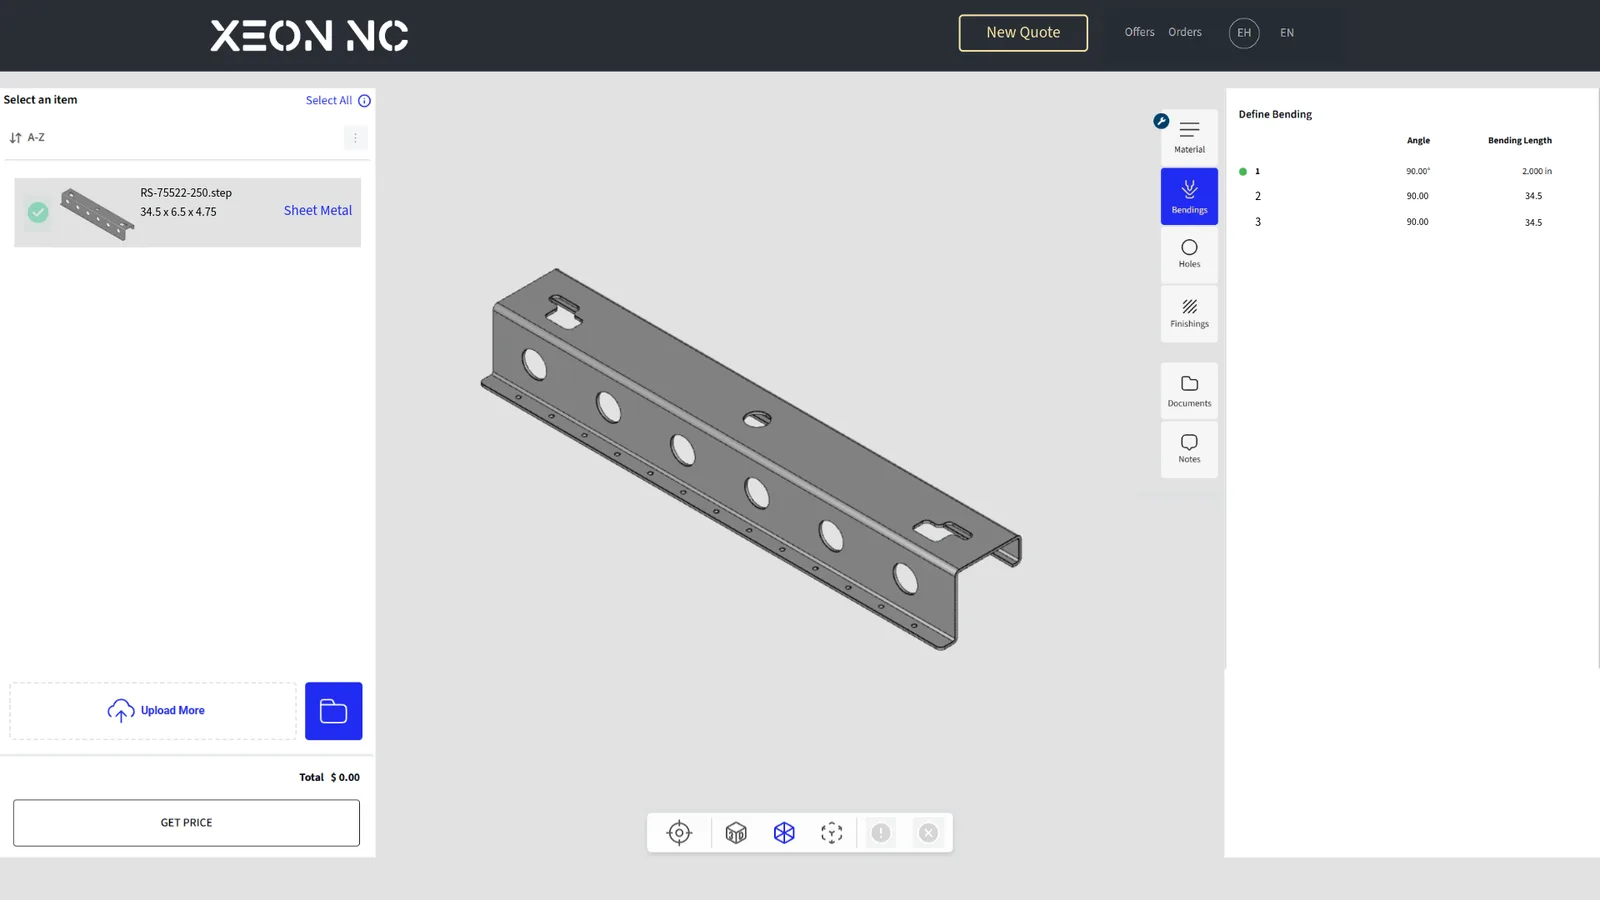
What to configure
- AngleBend angle. Specified in degrees from flat. 90° is the most common; acute (<90°) and obtuse (>90°) are supported.
- LengthFlange length. Distance from the bend line to the edge of the flange. Must respect minimum flange rules for your gauge.
- CountNumber of bends. Drives press-brake setup time. Multi-bend parts may require special tooling sequence.
- RadiusInner radius. Default radius equals material thickness (1T). Tighter radii are possible but may crack on harder alloys.
For a deeper dive on K-factor, bend allowance, and springback compensation, see the Sheet Metal Design Guide →
Holes — Configure Hole Processing and Finishing
The Holes panel controls everything that happens to circular features after they’ve been cut. Tapping, countersinking, hardware insertion, and edge deburring are all set per-hole or in batch.
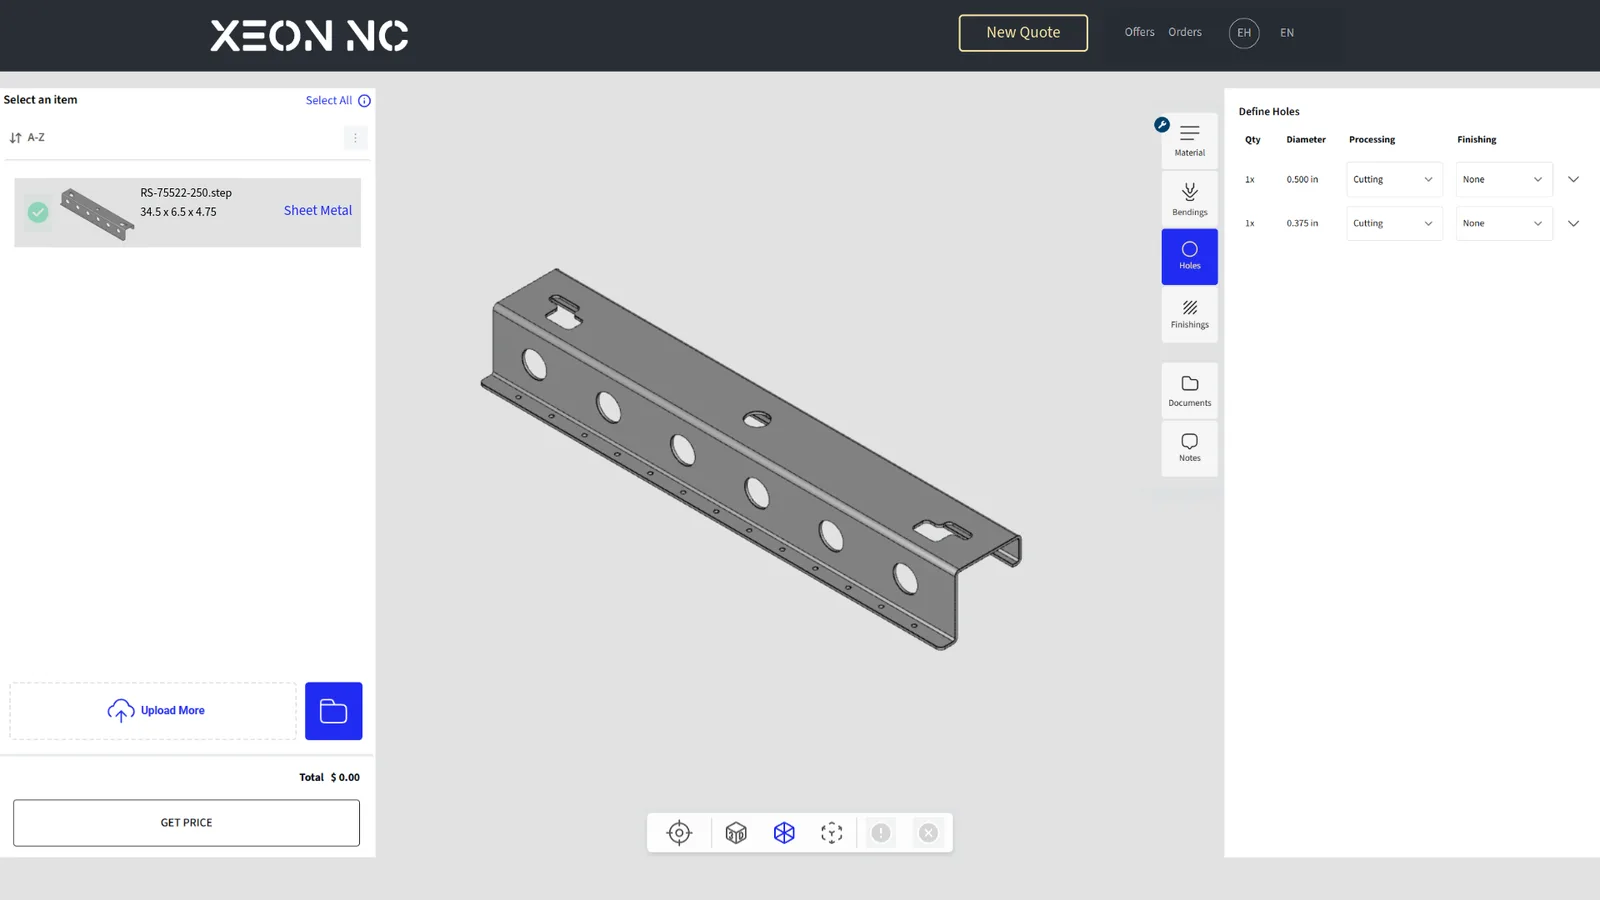
What to configure
- TapThreading. Specify thread size (e.g., M6×1.0, 10-32). The system applies the correct tap drill diameter automatically.
- C’sinkCountersink. Standard 82°, 90°, or 100° for flush fasteners. Specify major diameter and depth.
- PEMHardware insertion. Self-clinching nuts, studs, and standoffs pressed in during fabrication.
- DeburrEdge finishing. Removes the burr left by the laser. Standard on all parts; specify if heavier deburring is needed.
Finishings — Set Surface Finishing
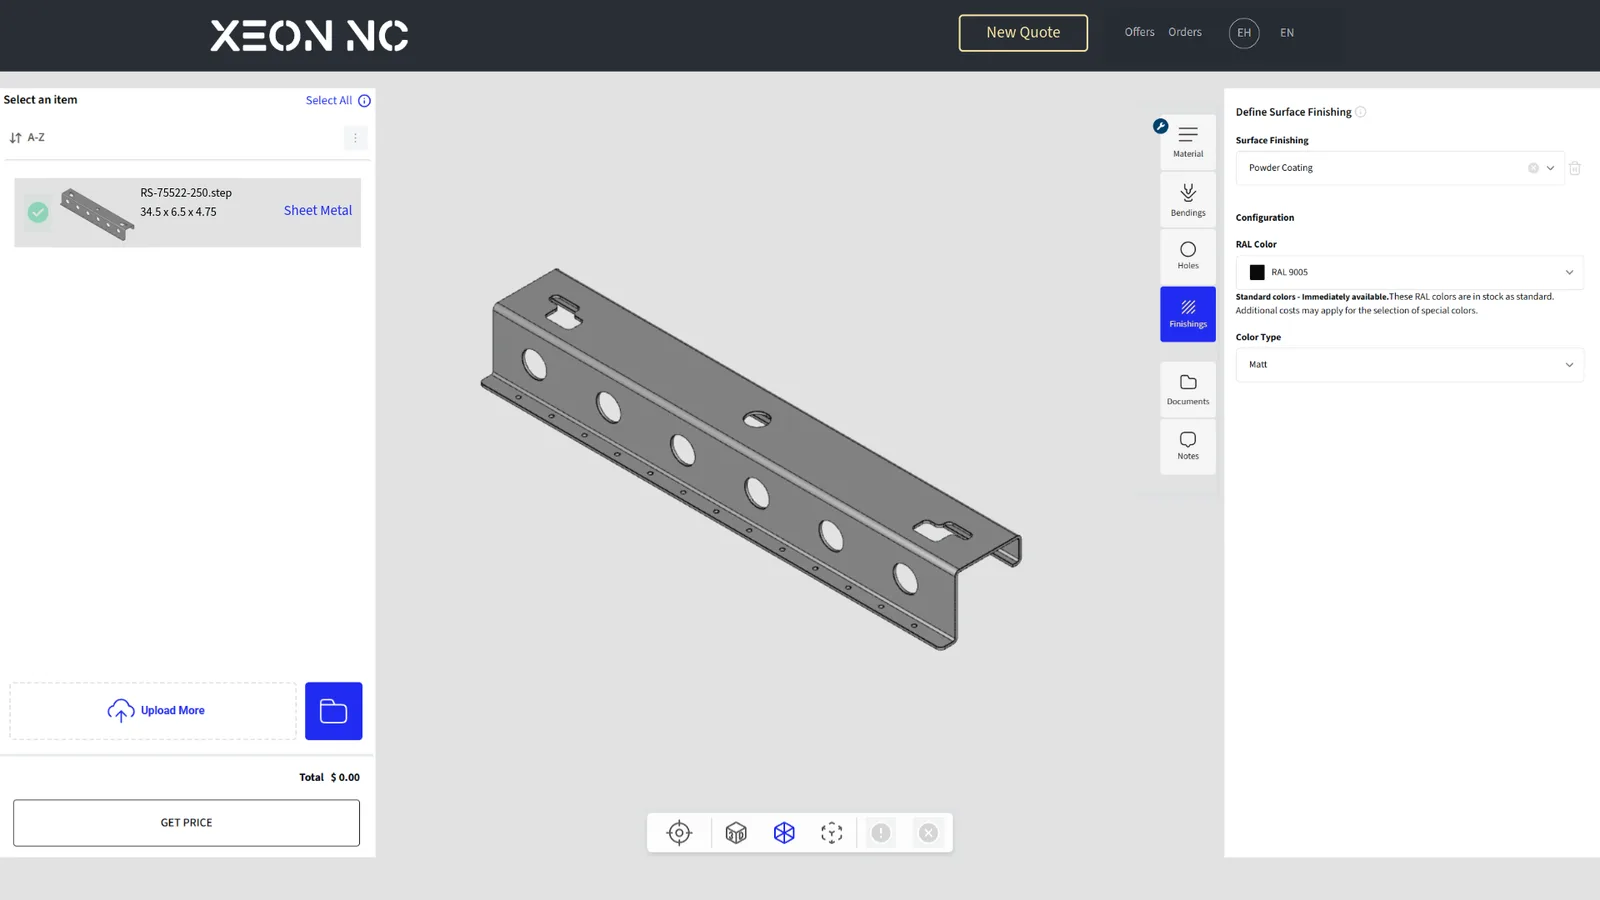
The Finishings panel is where you turn a raw part into a finished product. Choose your finish family (powder coating, anodizing, plating, or none), then drill into color, sheen, and pre-treatment options.
What to configure
- FinishFinish type. Powder coat, anodize (Type II / Type III), plating (zinc / nickel), or raw.
- ColorRAL or custom color. Select from the full RAL palette — e.g., RAL 9005 Jet Black, RAL 7016 Anthracite Grey, RAL 3020 Traffic Red.
- SheenGloss level. Flat, matte, semi-gloss, gloss, wrinkle, or texture finish.
- PrepPre-treatment. Chemical wash, sandblast, or zinc phosphate — required for outdoor or marine applications.
| Finish | Best for | Lead-time impact |
|---|---|---|
| Powder Coating | Steel & aluminum, painted look, durable outdoor | +2–3 days |
| Anodize Type II | Aluminum, decorative color, indoor | +3–5 days |
| Anodize Type III | Aluminum, hard-coat, wear resistance | +5–7 days |
| Zinc Plating | Steel, low-cost corrosion protection | +3–4 days |
| Raw / None | Welded sub-assemblies, paint-it-yourself | No impact |
Documents — Upload Technical Documents
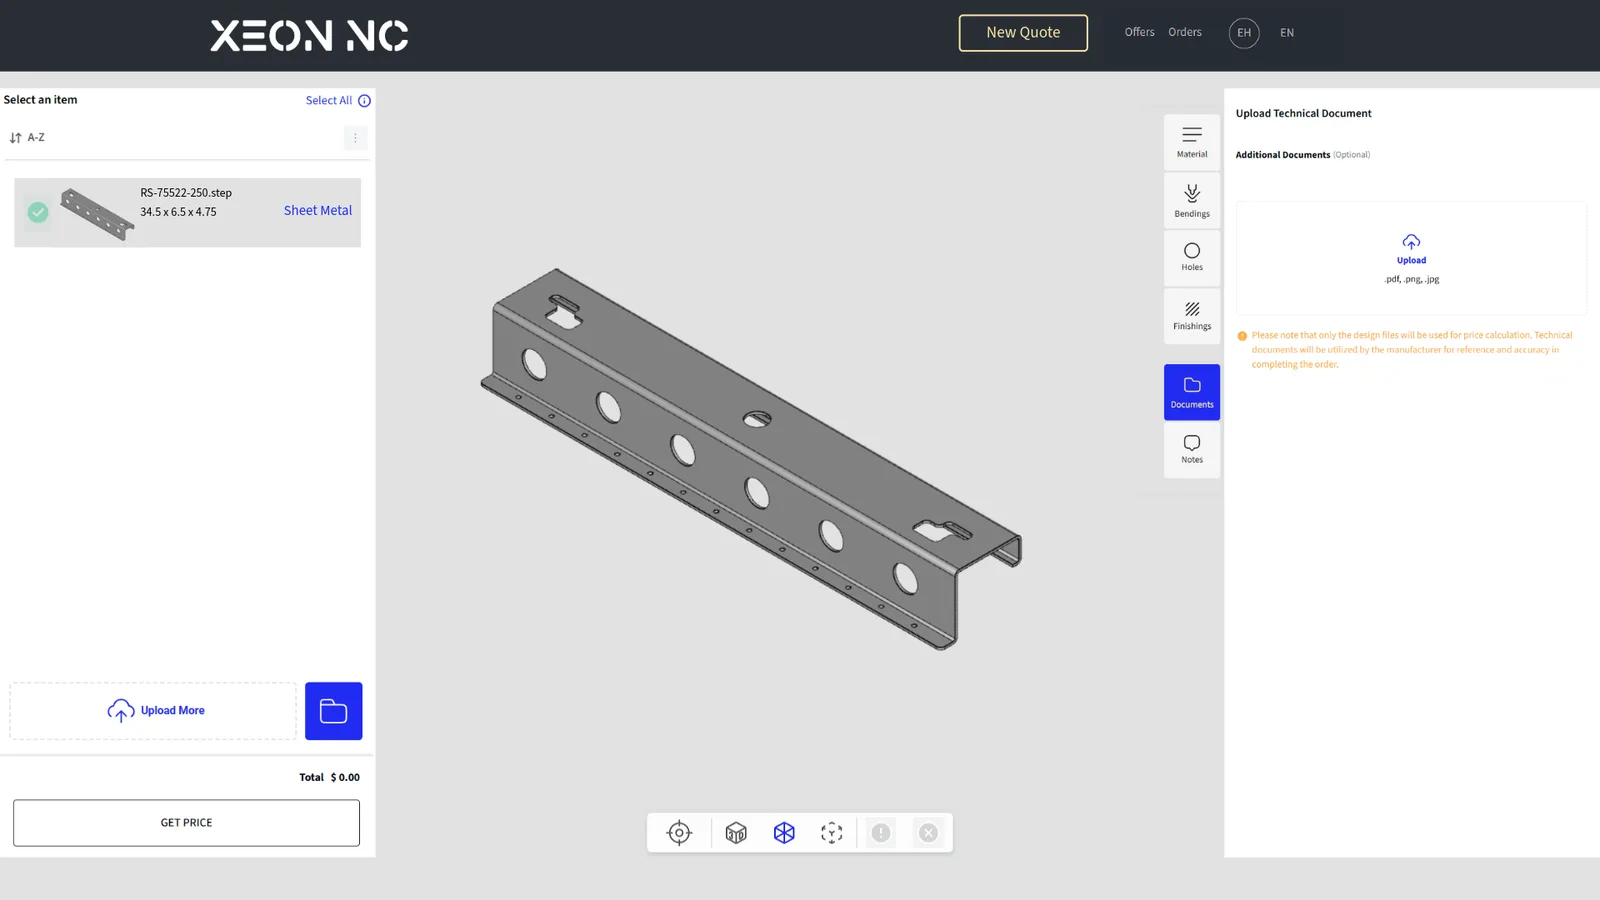
The Documents panel lets you attach anything that goes beyond the geometry — technical drawings, GD&T callouts, weldment specifications, hardware schedules, or finished-part reference photos.
What to upload
- PDFTechnical drawing. A 2D PDF with dimensions, tolerances, and finish call-outs is the single most useful document you can attach.
- STEPAssembly model. If your part fits into a larger weldment or fixture, the assembly STEP helps us check fit-up.
- DXFCut profile. If your CAD-derived flat differs from what you want cut (e.g., bend relief overrides), submit a DXF.
- IMGReference photo. A photo of an existing part, finish sample, or competitor product helps us match the look.
Notes — Add Notes for the Manufacturer
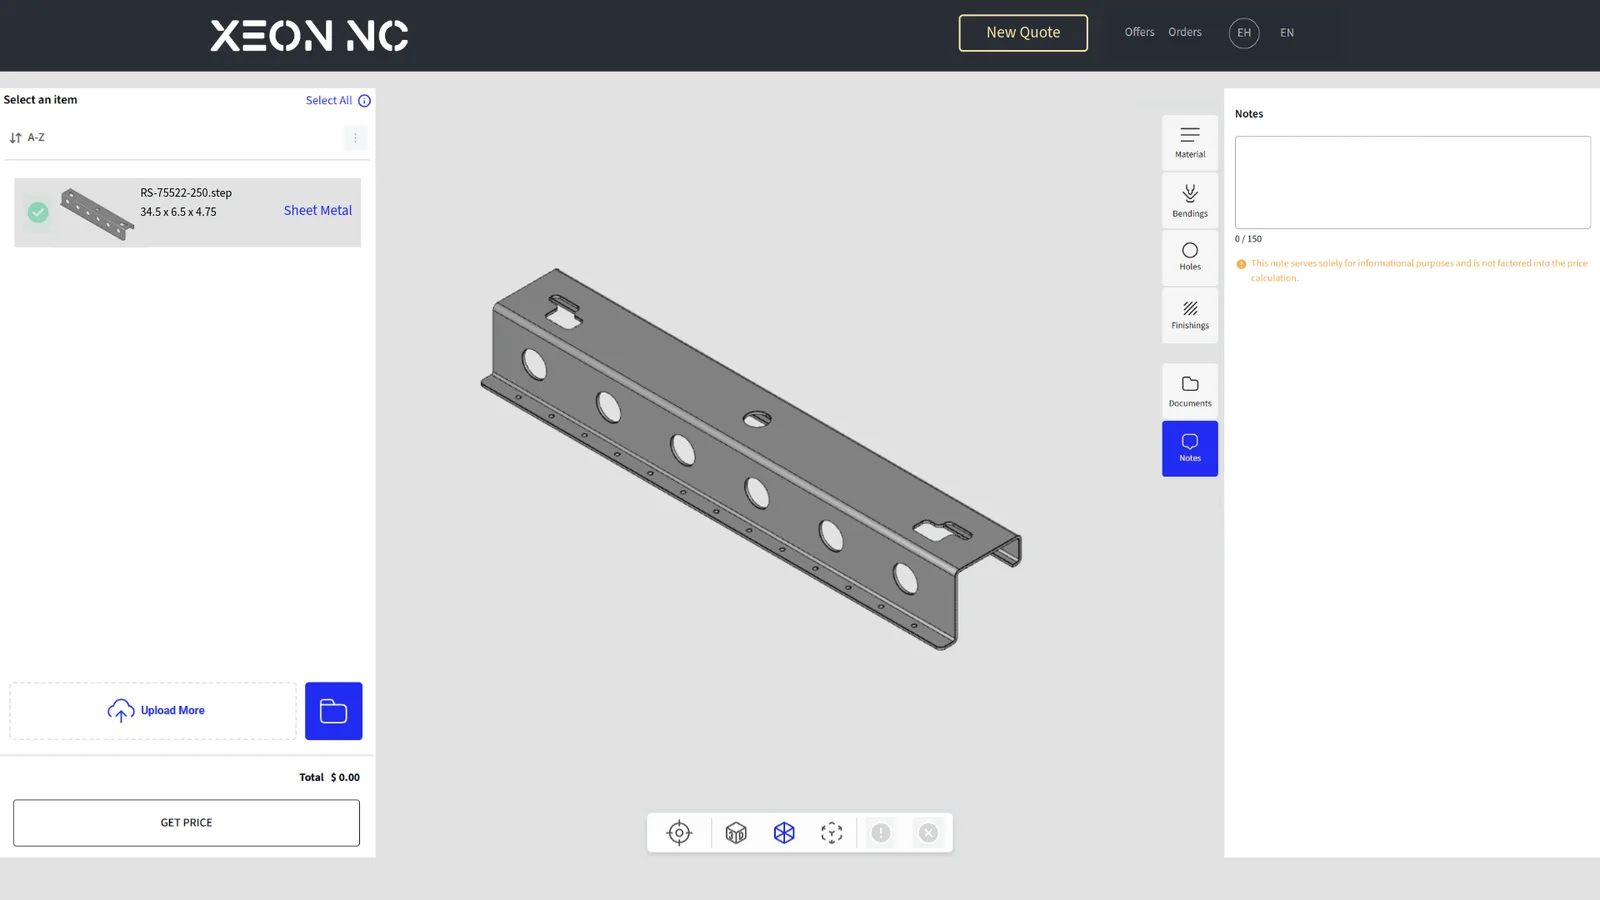
The Notes panel is the last step and the most flexible. Anything that doesn’t fit cleanly in the configuration panels above belongs here — from packaging instructions to inspection requirements to special handling.
What to write
- Critical dimensions. Call out tolerances tighter than ±0.005" so the operator knows to inspect them.
- Cosmetic A-side. If one face of the part will be visible in the finished product, identify it — we’ll nest with the cosmetic face down to protect from drag marks.
- Hardware orientation. For PEM nuts on multi-side parts, note which side the press-fit goes on.
- Special packaging. Individual bagging, foam-wrap, or fixturing for shipment.
- Inspection requirements. First-article inspection (FAI), CMM reports, or material certs.
- Drawing-vs-CAD precedence. Which one wins if they disagree.
Review & Submit
Before clicking Add to Cart, run through this checklist:
- Material & gauge match what your CAD geometry was designed for.
- Quantity reflects the production run, not just the prototype quantity.
- Bend angles show the correct count and direction (up vs. down).
- Hole processing applies to every hole that needs it — check the per-hole list.
- Finish color is a specific RAL or stock code, not a description.
- Documents include a 2D drawing if the part has tolerances tighter than ±0.010".
- Notes capture anything that’s not obvious from the CAD or drawing.
Pro Tips for Faster, More Accurate Quotes
Upload the STEP, not just the DXF
STEP files include bend information natively, so the system can pre-populate the Bendings panel for you instead of asking you to define each bend manually.
Quote the production qty up front
Quantity-break pricing kicks in at 10, 25, 50, and 100 pieces. Even if you only want a prototype, quoting at production volume tells you the unit cost you’re committing to.
Standardize your finish callouts
Always specify finish using RAL codes and a sheen level (e.g., “RAL 9005, semi-gloss”). It removes ambiguity and matches the way our finishing line is configured.
Group similar parts in one quote
Multi-part quotes nest more efficiently and share setup costs across a single sheet — you save more by quoting 5 parts together than 5 separate quotes.
Use the Notes panel liberally
It’s the cheapest insurance you have. A 30-second note about cosmetic A-side or critical tolerances can save a full re-make.
Save your configuration
The platform remembers your most recent material, finish, and hardware selections so re-ordering or re-quoting an iteration is one click away.