← Back to all guides
01 / Surface as System
The finish is the part’s first point of contact.
Every manufactured object meets the world through its surface. That boundary controls what the user sees, what the environment attacks, and what the assembly touches.
A finish may reduce corrosion, resist abrasion, control glare, provide electrical isolation, improve cleanability, identify product families, or carry a brand color. It can also change dimensions, close clearances, alter surface roughness, hide or reveal upstream defects, and determine how a part ages.
This is why finishing is not the decorative step after manufacturing. It is the final material system. The correct finish begins with the substrate, the environment, the tolerance plan, and the intended appearance—before a cutting path is released.
A finish is not what happens after the part is made. It is the state in which the part will work.
02 / Integral Oxide
“Fused” is shorthand. The mechanism is conversion.
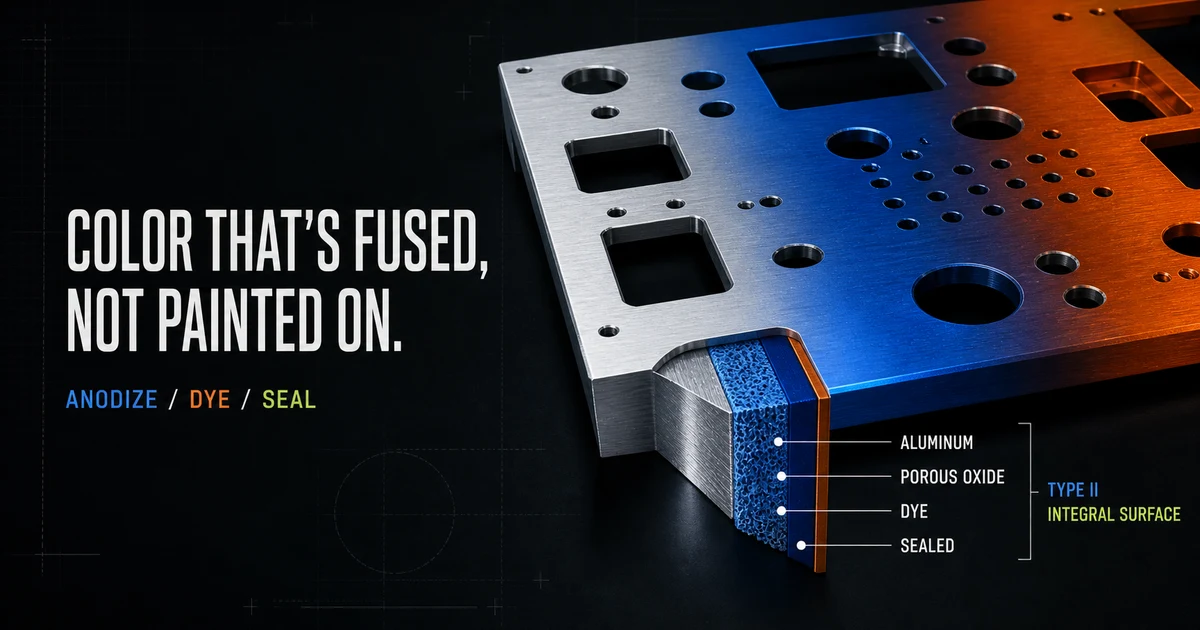
Anodizing is an electrochemical process that converts the aluminum surface into aluminum oxide. The new layer originates from the substrate instead of being deposited as a separate paint film.
The aluminum part becomes the anode in an acid electrolyte. Electrical current drives oxygen-containing ions to combine with aluminum at the surface. The resulting anodic oxide grows with an ordered, porous structure. Because that oxide is integrated with the underlying aluminum, it cannot peel or flake in the way a poorly bonded surface film can.
ANODIZED SURFACE / CONCEPTUAL CROSS-SECTIONGROWN / COLORED / SEALED
Sealed boundary
Hydrated oxide closes the pore openings, reduces absorption, and helps retain the coloring medium.
Color zone
Dye or deposited coloring material occupies the porous anodic structure rather than hiding it under an opaque film.
Anodic oxide
A controlled aluminum-oxide layer grows from the substrate. Part of the growth builds outward and part consumes the original surface.
Conceptual structure; layer proportions are intentionally exaggerated. “Fused” describes the integral result, not a thermal fusion process.
This distinction matters. Anodized color still can be scratched through if damage penetrates the oxide. Dyed colors also differ in lightfastness, and severe chemical or outdoor exposure requires the right dye, coating thickness, and seal. Integral does not mean indestructible. It means the protective structure and the metal are materially connected.
03 / The Control Sequence
Color is the output of five controlled stages.
The final appearance is decided long before the dye tank. Every stage establishes a condition the next stage inherits.
SUBSTRATE → OXIDE → COLOR → SEALED PART
01
Prepare
Clean, etch, desmut, and rinse. Surface preparation sets gloss, texture, uniformity, and how clearly machining marks remain visible.
02
Anodize
Apply controlled current in the electrolyte to grow the porous oxide. Time, chemistry, current density, temperature, alloy, and part geometry affect the result.
03
Color
Leave the oxide undyed for clear anodize or introduce dye or another coloring system into the open pore structure.
04
Seal
Close the pore openings to reduce absorption and improve the durability of the colored or clear finish.
05
Verify
Inspect color, coverage, seal quality, appearance, masked features, rack location, and any controlled dimensions affected by the finish.
Under the active MIL-PRF-8625 framework, Type II identifies conventional sulfuric-acid anodizing; Type III identifies hard anodic coatings. Class 1 is non-dyed and Class 2 is dyed. A complete callout defines the type, class, color, and any special requirements instead of relying on the word “anodized.”
04 / Appearance Is Process Data
The color remembers everything beneath it.
Anodizing preserves the metallic character of aluminum. That honesty is one of its strengths—and one of its constraints.
INPUT / ALLOY
Different aluminum alloys color differently.
Magnesium, silicon, copper, and other alloying elements influence clarity, tone, and uniformity. Parts expected to match should use the same alloy, temper, preparation, and batch whenever possible.
INPUT / SURFACE
Anodize reveals the upstream surface.
Toolpaths, scratches, grain direction, blended welds, etch texture, and handling marks can remain visible. Cosmetic intent must be designed into machining and preparation.
INPUT / DYE + SEAL
Saturation and durability are controlled together.
Oxide thickness, pore structure, dye chemistry, concentration, time, temperature, and seal quality affect the final color and its resistance to service conditions.
OUTPUT / EXPECTATION
Color needs an acceptance language.
Use physical samples, agreed ranges, and batch controls for cosmetic matching. “Blue” is a direction; an approved sample defines the decision.
05 / Finish Architecture
Integral is not always superior. It is a different system.
The right finish is the one whose structure matches the substrate, environment, geometry, appearance, and service life.
System
Structure
Best fit
Watch closely
Type II anodize
Integral oxide
Aluminum panels, enclosures, controls, branded components, corrosion resistance, metallic appearance.
Alloy variation, rack points, dyed-color lightfastness, dimensional change, caustic exposure.
Type III hardcoat
Thicker hard oxide
Wear surfaces, sliding interfaces, functional parts, added abrasion resistance.
Tighter dimensional planning, rougher/darker appearance, limited cosmetic color expectations.
Powder coating
Cured polymer film
Opaque RAL colors, textures, steel or aluminum parts, visual consistency, broader color freedom.
Film buildup, threaded features, Faraday-cage areas, edge coverage, cure temperature.
Mill + deburr
Exposed substrate
Fast prototypes, internal components, grounded interfaces, parts where finish is unnecessary.
Fingerprints, oxidation, cosmetic variation, exposed machining and material marks.
Powder coating is not anodizing done in another color. Dry powder is electrostatically deposited, then heated until the coating melts and cures into a continuous polymer film. That added layer is precisely why powder can provide opaque color and hide more substrate variation—and why film thickness must be planned around fits, threads, and masked interfaces.
06 / Design for Finishing
The bath needs access. The current needs contact.
A successful anodized part includes process access, electrical contact, drainage, dimensional allowance, and an appearance strategy.
01
Choose the alloy before choosing the color.
Use the same aluminum alloy and temper for parts expected to match. High-copper or high-silicon alloys may produce darker, less uniform, or less decorative results.
02
Identify the rack point.
Anodizing requires electrical contact. The contact location will not finish like the surrounding surface, so place the rack mark on a hidden or non-cosmetic area.
03
Protect critical interfaces.
Mask bearing seats, grounding faces, precision bores, and features that must remain conductive. Plan threads for masking, chasing, or post-finish machining.
04
Account for oxide growth.
Anodic oxide consumes part of the substrate and builds partly outward. Tight fits and mating dimensions must be specified in their required final, finished condition.
05
Finish forming and cosmetic preparation first.
Bends, blended welds, deburring, graining, and required surface preparation normally precede anodizing. The finish cannot erase an upstream defect.
06
Sequence markings and hardware deliberately.
Laser marking after anodizing can create crisp contrast. Hardware, mixed metals, masking, and electrical requirements should be reviewed before the process route is released.
07 / Selection Logic
Start with function. Then choose the color system.
A finish decision becomes straightforward when the real requirement is stated first.
Need metallic appearance + thin integral protection on aluminum?
Choose Type II anodize.
Clear or dyed; well suited to visible aluminum panels and components.
Need harder wear behavior on aluminum?
Evaluate Type III hardcoat.
Prioritize function and dimensional planning over bright cosmetic color.
Need opaque color, texture, or a non-aluminum substrate?
Choose powder coating.
Broad RAL palette across steel, stainless, and aluminum, with film buildup included in the design.
Need speed, conductivity, or an internal non-cosmetic part?
Keep mill finish or specify selective finishing.
Do not add a process that the function does not need.
The finish name is only the beginning. Exposure, cleaning chemicals, abrasion, UV, electrical behavior, touch surfaces, assembly sequence, and acceptable appearance variation determine whether the system is actually correct.
08 / Product Definition
Specify the finished part, not just the finish.
Manufacturing needs an unambiguous final state: process, class, color, surface, masking, dimensions, appearance, and inspection.
01
Name the process and governing specification.
For controlled Type II work, use a complete callout such as “ANODIZE PER MIL-PRF-8625, TYPE II, CLASS 2, BLACK,” with project-specific requirements as needed.
02
Define cosmetic surfaces.
Mark visible faces, grain direction, permitted rack locations, and any sample or color range governing appearance.
03
Define masked and conductive areas.
Identify threads, grounding points, contacts, press fits, bores, and mating faces that must remain bare or tightly controlled.
04
Dimension the final condition.
State whether critical dimensions apply before or after finishing. Do not leave the manufacturer to infer the functional state.
Color is not decoration applied to the end of the process. It is controlled material at the boundary.
Alloy / finish / color / final condition
Send the part and its surface requirements.
Upload the model with a drawing that identifies finish type, color, cosmetic faces, rack and mask locations, critical finished dimensions, and any governing sample.
Upload your files →